Fluid EA for MT4 & MT5
MetaTrader Expert Advisor
The Fluid EA serves as a comprehensive, all-in-one MetaTrader expert advisor engineered for both MT4 and MT5 environments. It utilizes a versatile strategy that incorporates trend-following mechanics, strategic hedging, and martingale logic to dynamically trail price movements and manage open trades. Central to its design is the proprietary Auto Recovery hedging algorithm, which is specifically developed to assist forex traders in maintaining rigorous risk management. By seamlessly blending trend-aligned entries with robust recovery protocols, this expert advisor streamlines trade execution and provides an automated framework for navigating market drawdowns, ultimately fostering greater consistency in account performance.
Alternative download link Added to cart — redirecting to checkout in 3 seconds...
Key Features of the Fluid EA for MT4 & MT5
- Detect the trend using a combination of simple and exponential moving averages.
- Enter and exit trades at precise levels using a non-lag moving average color change indicator.
- Hedge a trade or basket, or use stop-loss/take-profit to trail the price using hedging techniques.
- Manage lot sizes, stop-loss, take-profit, trailing, break-even, martingale, and more.
RobotFX Fluid is an all-in-one MetaTrader expert advisor for MT4 and MT5 that identifies the trend, opens and closes trades at optimal entry/exit levels, manages winning trades, and recovers losses using hedging (zone recovery) or trend-following strategies.
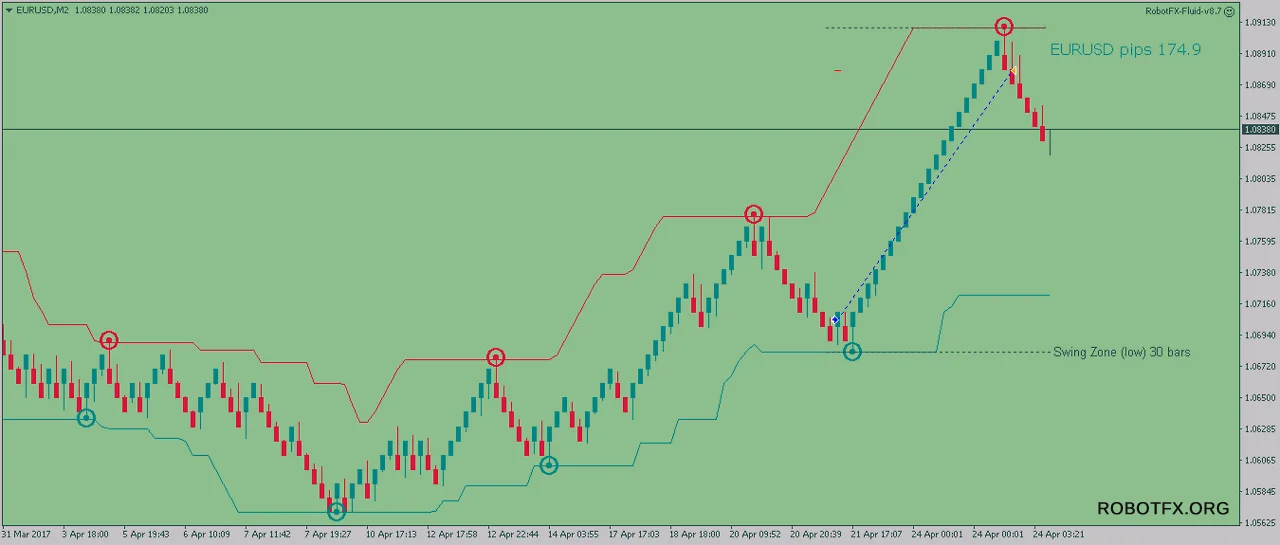
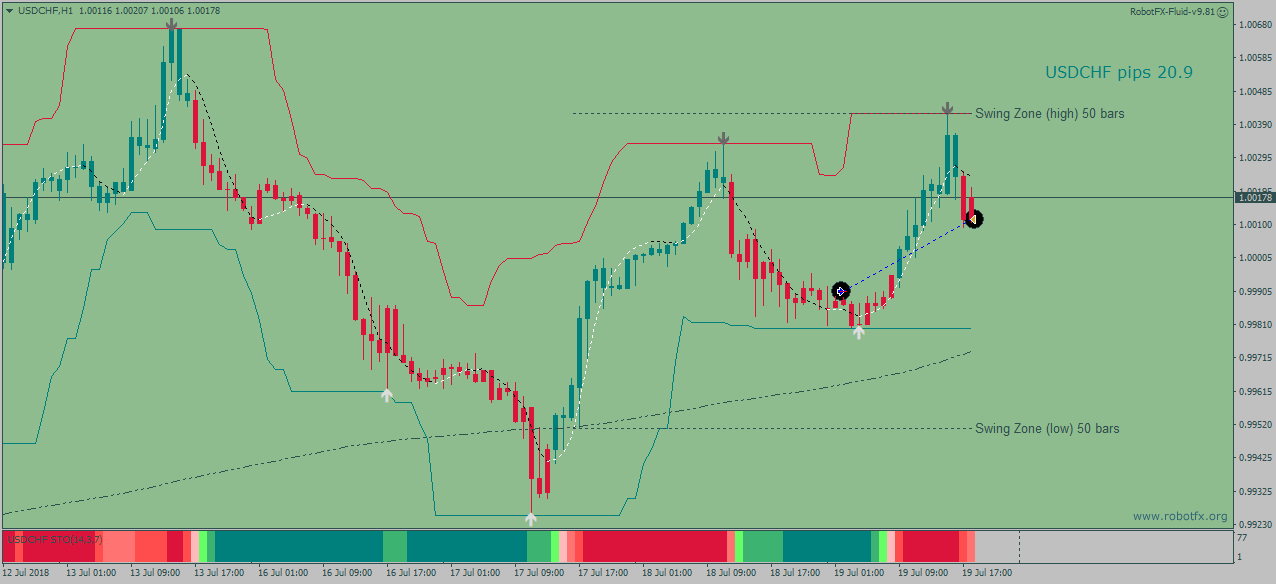
To better understand how this trend-following EA with advanced hedging works, see the chart below:
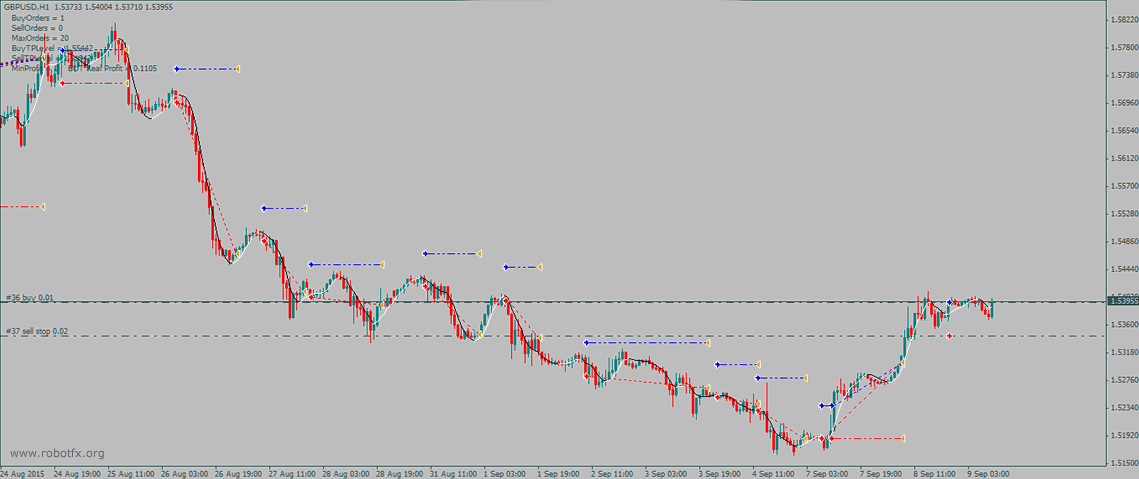
The RobotFX Fluid EA not only detects trends and trading signals, but also helps traders with trade and money management — a step where 95% of traders fail. Many traders rely too heavily on stop-loss, fixed take-profit, or rigid risk/reward rules. Instead, this EA focuses on managing losing trades and following the trend effectively.
If 95% of forex traders lose money, do I really want to follow the same rules they do?
This question is key when using trading strategies or automated software. Only a small percentage of traders consistently profit. Many fail because they give up after losses or constantly switch strategies. RobotFX Fluid addresses this by letting traders follow trends while recovering losses.
You’re likely among the 95% who are struggling — here’s simple trading advice: focus first on not losing. Over time, you’ll identify profitable strategies. But without knowing how to manage losing trades, you cannot succeed. Fluid EA helps by turning losing trades into winning baskets using advanced hedging and zone recovery strategies.
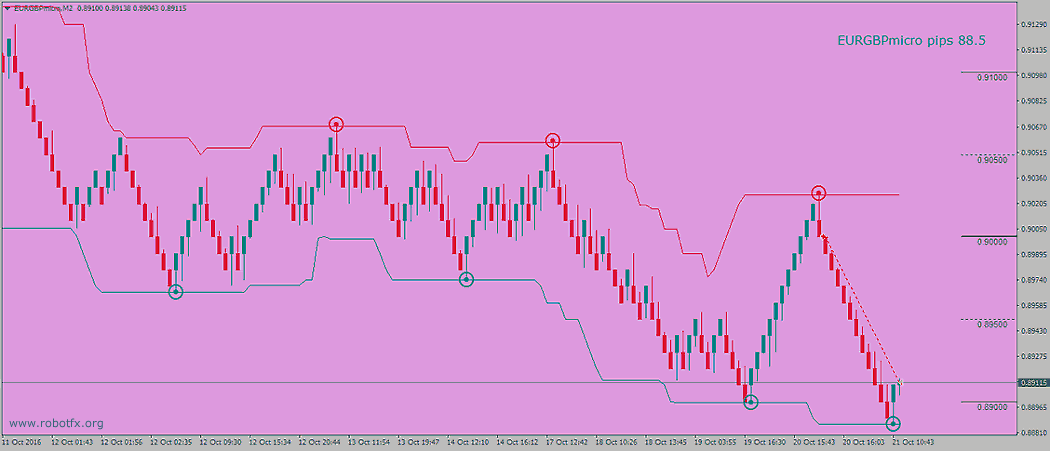
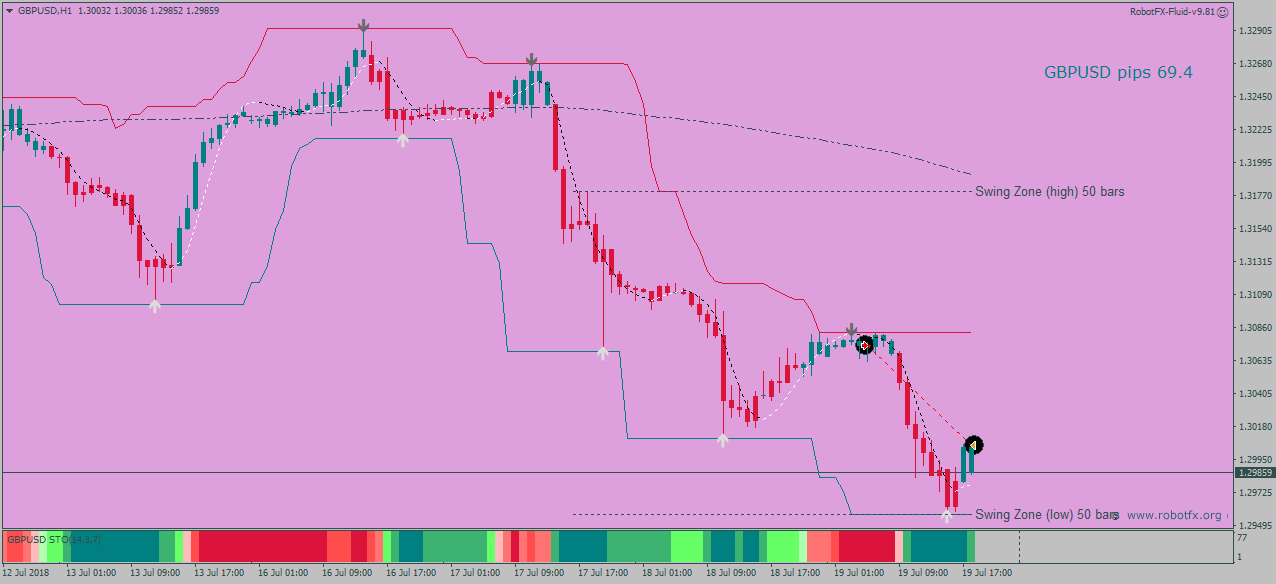
In the chart above, a downtrend is detected. Fluid EA opens short trades, closes them in profit, and uses hedging techniques to recover losses when the trend reverses. The EA trades according to trends, but can also manage trades on Renko charts in addition to candlesticks.
By hedging a recovery zone or trading with the trend, the EA can transform every losing trade into a winning basket, while still allowing classic stop-loss, take-profit, or trailing stops.
The EA then detects the next trend signal with the non-lag moving average indicator, opens the proper trades, and continues following the trend while managing losing positions effectively.
Fluid EA Trade Examples
To trade with the trend on Renko charts you need a Renko expert advisor to generate the Renko blocks. RobotFX Renko EA can create Renko charts.
Configuring Fluid EA Settings
- Enter your Client Email - Fill this with your email IF you are using a paid version of this EA on your LIVE account
- Sunday to Friday - Trade on specific days or every day of the week
- NFP Friday - Whether or not you want to trade on volatile Non-Farm Payroll day (first Friday of the month)
- Thursday Before NFP - Choose if you want to trade on the Thursday before the NFP
- Christmas Holidays - Whether or not you want to trade during a custom defined period in December, during the low liquidity of the Christmas Holidays
- Christmas Holidays Start (20th Dec) - This is the day in December you will start to filter out, as the beginning of the Christmas Holiday. Default is 20th, you can enter any date instead of 20
- New Years Holidays - Choose if you you want to trade during a custom defined period in the beginning of January, the low liquidity of the New Years Holidays
- New Years Holidays End (5th Jan) - This is the day in January you stop the filter, the end of the New Years holiday period. Default is 5th January, you can enter any date instead of 5
- Auto GMT Offset - Indicate if you want auto GMT offset turned on or off. Turn off during back testing
- Manual GMT Offset - If AutoGMTOffset is turned off, indicate what your manual GMT offset would be
- Enable Trading Session - Set to false to ignore the below trading sessions, or to true to trade within the sessions
- Trade Tokio Session - Whether or not to trade Asian session
- Start Tokio Session - Don’t trade before this time. If you include Australia, Sydney starts at 21.00, and Tokyo starts at 23.00 GMT
- Finish Tokio Session - Don’t trade after this time. Defaulted at 07.00, the start of the European Session. Note: The Tokyo session continues on for 1 more hour to end at 08.00, so if you are interested in trading this session in its entirety, you should indicate from 23:00 to 08.00
- Trade London Session - Whether or not to trade European session
- Start London Session - Don’t trade before this time. Defaulted at 7.00 GMT, the start of the London Session, though Germany does not open till 08.00
- Finish London Session - Don’t trade after this time. Note: The European Session continues till 16.00, so if you are interested in trading this session in entirety, you should have your defaults from 7.00 to 16.00
- Trade New York Session - Whether or not to trade the New York session
- Start New York Session - Don’t Trade before this time. Note that the NY stock exchange does not open till 9:30 EST, or 13.30 GMT, and the first hour and half (from 9:30 to 11:00 EST, or 13:30 to 15:00 GMT) is heavy trading, lots of liquidity
- Finish New York Session - Don’t Trade after this time
- Trading - whether or not to allow the EA to open trades in a particular direction (Buy, Sell), any direction (Buy & Sell) (this is ignored by the hedging trades opened when Hedging Method = Hedge Zone (within the Recovery Zone)
- Enable Lot Size Management (%) - Whether or not to use a percentage of the Free Margin to open the next first trade. Note: does not apply to hedging or martingale lotsize
- Lotsize as % of Free Margin - the size of the first opened trade as percentage of Free Margin, if the Lot Size Management (above) is enabled
- LotSize as Fixed Value - the size of the first opened trade, if the Lot Size Management is set to false
- Minimum Profit ($$$.$$) - the minimum profit, in deposit currency, to close a trade or a basket of trades
- Maximum Loss (-$$$.$$) - the maximum loss, in deposit currency, to close a trade or a basket of trades
- Stop Loss / Recovery Zone (pips) - the distance (pips) from the opened trade where the stop-loss will be placed or, if Hedging Method = Hedge Zone, the height of the Recovery Zone
- Take Profit (pips) - Take profit distance in pips. The ratio between Stop Loss and Take Profit is also used to calculate the opposite hedging trades
- Maximum Orders - the maximum numbers of allowed trades. When this number is reached, the EA will not open any other trades
- Slippage (pips) - the buffer allowed when opening new trades or placing pending orders
- BreakEven / Trailing Stop (pips) - the distance the price has to move in your favor, for the expert advisor to place the stop-loss
- Buffer for BreakEven & Close Losing Trades... (pips) - this adds to the BreakEven / Trailing Stop above, so when the EA places the stop-loss, it will be in profit with this number of pips. AKA locking the profit
- Trailing Step (pips) - the EA will move the stop-loss of the trade at the Trailing Stop distance from the actual price, as soon as this is at Trailing Step distance from the opening price. AKA trailing the price
- Close Trades When Maximum Orders is reached - whether or not to allow the EA to close all the trades on the chart as soon as this number is reached
- Close Trades When Maximum Loss is reached - whether or not to allow the EA to close a trade or basket of trades as soon as the profit reaches Maximum Loss (-$$$.$$)
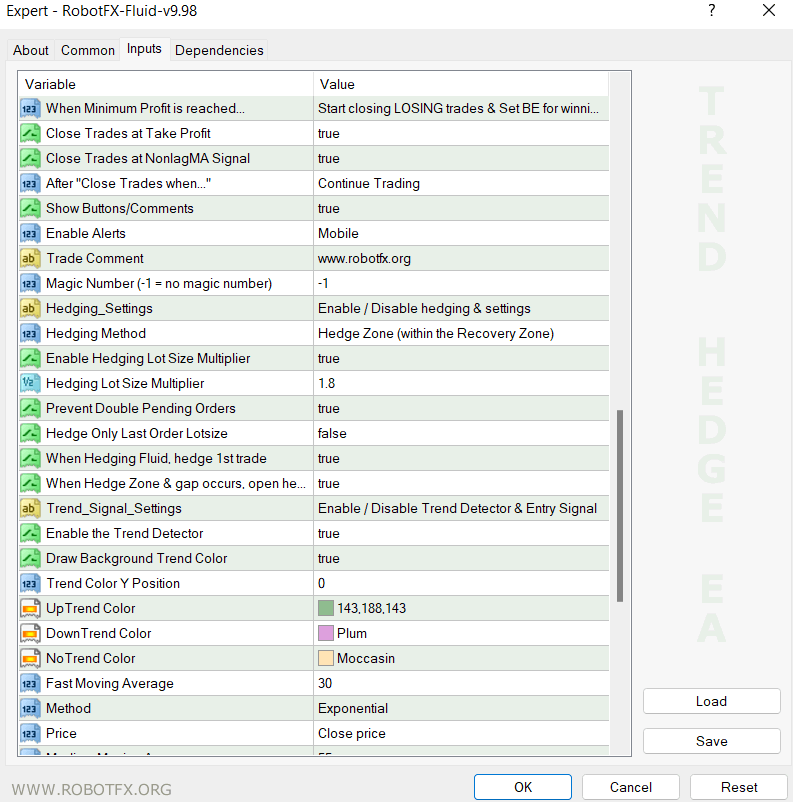
- When Minimum Profit is reached... - what to do when the profit reached Minimum Profit ($$$.$$)
- Start closing ALL trades on the chart - whether or not to allow the EA to close a trade or basket of trades as soon as the profit reaches Minimum Profit ($$$.$$)
- Start closing LOSING trades & Set BE for winning trades - close the losing trades and set a stop-loss for the winners
- Close Trades at Take Profit - whether or not to allow the EA to close a trade or basket of trades at Take Profit level (Minimum Profit must be reached as well)
- Close Trades at NonLagMA Signal - whether or not to allow the EA to close a trade or basket of trades at NonLagMA signal (Minimum Profit must be reached as well)
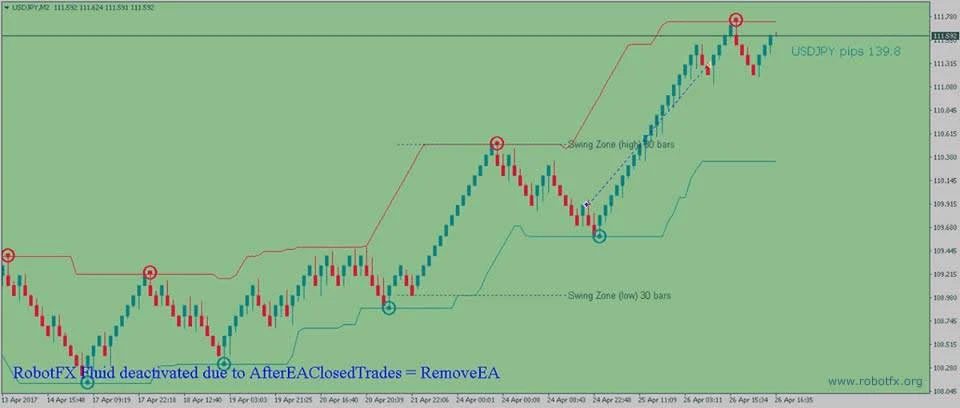
- After "Close Trades when..." - after the EA closes a trade/basket, it could continue trading (Continue Trading), remove itself from the current chart (Remove the EA from the chart) or close the trading terminal (Close MetaTrader)
- Show Comments on Chart - whether or not to display the trading details on the chart
- Enable Alerts - whether or not to get notified (alerts, email, push notifications or all) when trades open/close
- Trade Comment - used to monitor trades opened by this expert advisor
- Magic Number (-1 = no magic number) - change this when activating the EA on other charts of the same pair, otherwise the EA on one chart will execute its commands on the others. Leave to -1 to allow the EA to monitor/hedge trades opened manually
- Hedging Method - choose your desired hedging method (Hedge Zone - use a zone recovery (powered by the same algorithm as our Auto Recovery EA, an improved version of Joseph Nemeth's zone recovery trading algorithm), or Hedge Fluid - hedge with the trend) or disable hedging (No Hedging) and the trade(s) will use a classic stop-loss (Stop Loss) and take-profit (Take Profit)
- Enable Hedging Lot Size Multiplier - whether or not to use a lotsize multiplier when hedging. If set to false, the EA will use the ratio between the Stop Loss/Take Profit (1:1 ratio means double the lotsize)
- Hedging Lot Size Multiplier - the next (opposite) hedging order lotsize multiplier
- Hedge Only Last Order Lotsize - if enabled, it will set the hedging lotsize based on the last order lotsize instead of considering the entire baskets of opposite trades
- When Hedging Fluid, hedge 1st trade - whether or not to place one zone recovery pending hedge order even when Hedging Method = Hedge Fluid
- When Hedge Zone & gap occurs, open hedge trade - whether or not to automatically hedge an opened trade when the price skips a pending hedge order (such as when gaps occur during weekends)
- Enable the Trend Detector - whether or not to use the trend detector. If this is set to false the EA opens the trade when the nonlagMA signal changes its color, regardless of the moving averages below (Fast Moving Average, Medium Moving Average, Slow Moving Average)
- Trend up = price bigger than Slow Moving Average and Fast Moving Average is bigger than Medium Moving Average. If this is the case the EA will only allow buy trades to be opened
- Trend down = price smaller than Slow Moving Average and Fast Moving Average smaller than Medium Moving Average. When this happen the Fluid EA will only allow the short trades
- The trend detector applies to the 1st opened trade and to the hedging trades opened when the Hedging Method = Hedge Fluid, except for the first hedging one IF When Hedging Fluid, hedge 1st trade = true
- Draw Background Trend Color - enables you to change the color of the chart based on the trend, this way eliminating the need for other indicators and having a cleaner chart
- Trend Color Y Position - used to resize the background trend to a custom height, so it will not cover the entire background
- NonLagMA Indicator Name (without .ex4) - the name of the nonlagma indicator used (we've released 2 versions, you’ll probably want to use the latest)
- Entry Signal (NonLagMA Indicator Length) - this is the nonlagMA entry/exit signal. A smaller number will generate more signals (and probably more fakes) while a bigger number will generate less signals
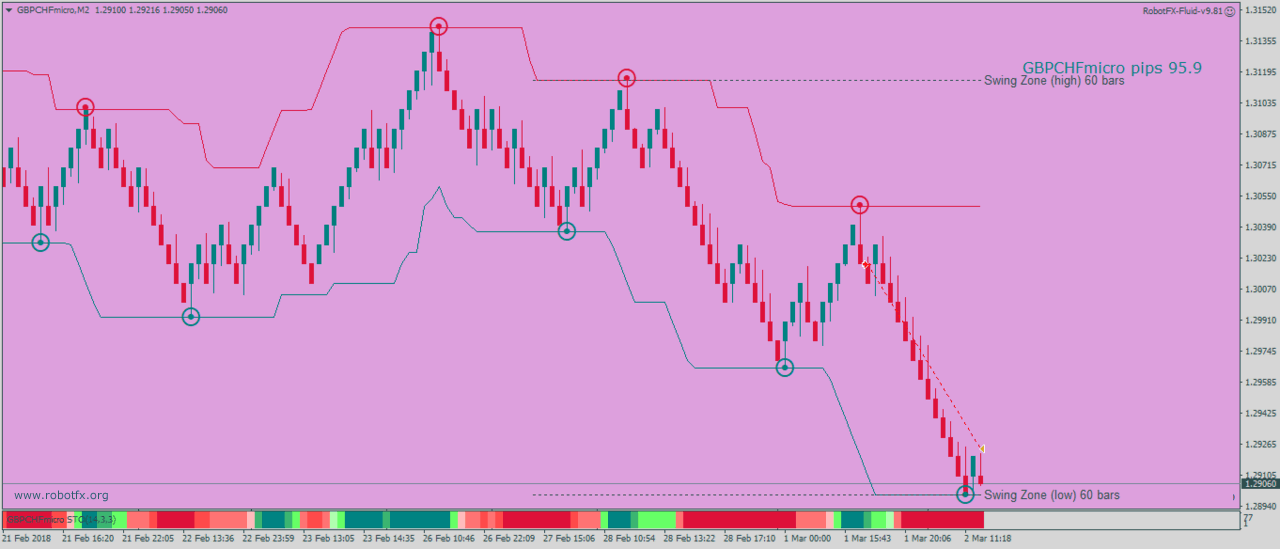
- Swing Zone Bars - the number of bars to determine the swing zone’s highs and lows)
- Pips Away From Last Swing (0 = swing zone disabled) - EA will open new trades only if the nonlagma signal occurs this number of pips away from the last swing in the direction of the trend. Set to 0 to ignore the swing zone confirmation
- Show the Swing Levels on Chart - whether or not to display these level on the chart
- Enable Martingale - whether or not to increase the lotsize of the next opened order if previous order closes with negative profit
- Martingale LotSize Multiplier - the martingale multiplier for the previous (losing) order
- Martingale Level - the number of times (in a row) the expert advisor will keep increasing the lotsize of the next opened trade; after that it will resume with the initial LotSize
- FullLogs - whether or not to enable the logs; useful for detecting possible issue, but use carefully because it increases the logs file size
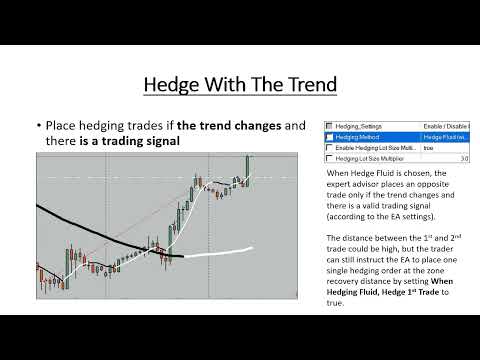
How to choose hedging settings
How do you determine your manual GMT offset?
Go to Greenwich Mean Time Find your brokers time by seeing it displayed in your trading platform under Market Watch (the top left hand side of your MetaTrader4 platform). Now do a little math to find out the hourly difference between the GMT and your brokers time. That is the offset. If the market watch time is ahead of the GMT then your setting is a positive number. But don't use a plus sign. Just write as you normally would for a positive number. If your broker's time is behind the GMT put a negative sign in front of the number.
Differences between MT5 EA version compared to MT4 EA
The Fluid MT5 expert advisor:
- delays opening of trades by a trader defined number of candles/bars to prevent too many orders being places by:
- If no open trades, open first trade after previous - applies when there are no trades on the chart
- If opened trades, open next trade after previous - applies when there are trades on the chart
- if BreakEven is disabled, it will only be used by the Close LOSERS and set BreakEven
- trailing has been implemented, following the same criteria as Trailing Stop EA
- entry logic is driven by a non-lag moving average color change indicator
- trend structure is based on moving averages, including tools such as the moving average system
- optional recovery and hedging logic can be extended using advanced zone recovery techniques
Frequently Asked Questions (FAQ)
What is the RobotFX Fluid EA?
It is a MetaTrader 4 and 5 expert advisor that uses a grid trading strategy combined with trend detection and hedging to automate forex trading decisions.
Does the Fluid EA use martingale?
No, it does not rely on uncontrolled martingale logic. Instead, it uses structured grid spacing and optional lot scaling with risk controls.
Can I use it on MT4 and MT5?
Yes, the EA is fully compatible with both MetaTrader 4 and MetaTrader 5 platforms.
Is hedging required?
No, hedging is optional. It can be enabled or disabled depending on the trader’s strategy and risk tolerance.
Do I need a VPS to run it?
A VPS is recommended for continuous operation, especially if you are running the EA on live accounts, but not required if you have a permanently connected to the internet trading PC.
Is the EA suitable for beginners?
It can be used by beginners, but it is recommended to first test it on a demo account to understand grid behaviour and risk settings.
sHow to Attach RobotFX Fluid EA to MetaTrader 4 / MetaTrader 5
Step 1: Download the EA file
Download the RobotFX Fluid Expert Advisor file (MT4 or MT5 version) and make sure it is saved on your computer as an .ex4 or .ex5 file.
Step 2: Open MetaTrader platform
Launch MetaTrader 4 or MetaTrader 5 and log in to your trading account (demo or live).
Step 3: Open Data Folder
Go to File → Open Data Folder, then navigate to:
MQL4 → Experts (for MT4) or MQL5 → Experts (for MT5)
Step 4: Install the EA
Copy and paste the EA file into the Experts folder. Then restart MetaTrader or refresh the Navigator panel.
Step 5: Attach EA to chart
Open a chart of your chosen trading pair (e.g. EURUSD), then drag the RobotFX Fluid EA onto the chart from the Navigator panel.
Step 6: Enable automated trading
Make sure AutoTrading is enabled in MetaTrader and allow:- Live trading
- DLL imports (if required by settings)
Step 7: Configure settings
Adjust EA inputs such as trend detection, hedging mode, lot size, stop-loss, take-profit, trailing stop, and session filters according to your trading strategy.
Step 8: Start trading
Once attached and configured, the EA will automatically detect trends, open trades, and manage positions based on your selected settings.
RobotFX Fluid EA Video Tutorial
What you will learn in this video: you will learn how to identify and confirm market trends in MetaTrader using structured price analysis and moving average-based direction filtering. The video explains how to distinguish between strong trends and ranging conditions, and how these conditions affect the quality of trade entries in automated systems. You will also see how an Expert Advisor applies trend-following logic to align trades with market momentum, increasing the probability of sustained moves in the direction of the trend.
In addition, the walkthrough covers how automated trading systems use indicators such as NonLag Moving Average and similar filters to reduce market noise and avoid false signals. You will understand how recovery and hedging mechanisms can be applied within a trend-focused strategy, including the concept of a recovery zone and how losing positions can be managed without abandoning the main directional bias. Finally, the video demonstrates how parameter optimization and risk management settings influence EA performance, helping you adapt the system for different market conditions and trading styles.
You will have to watch the rest of the videos too if you want to master this trading tool.